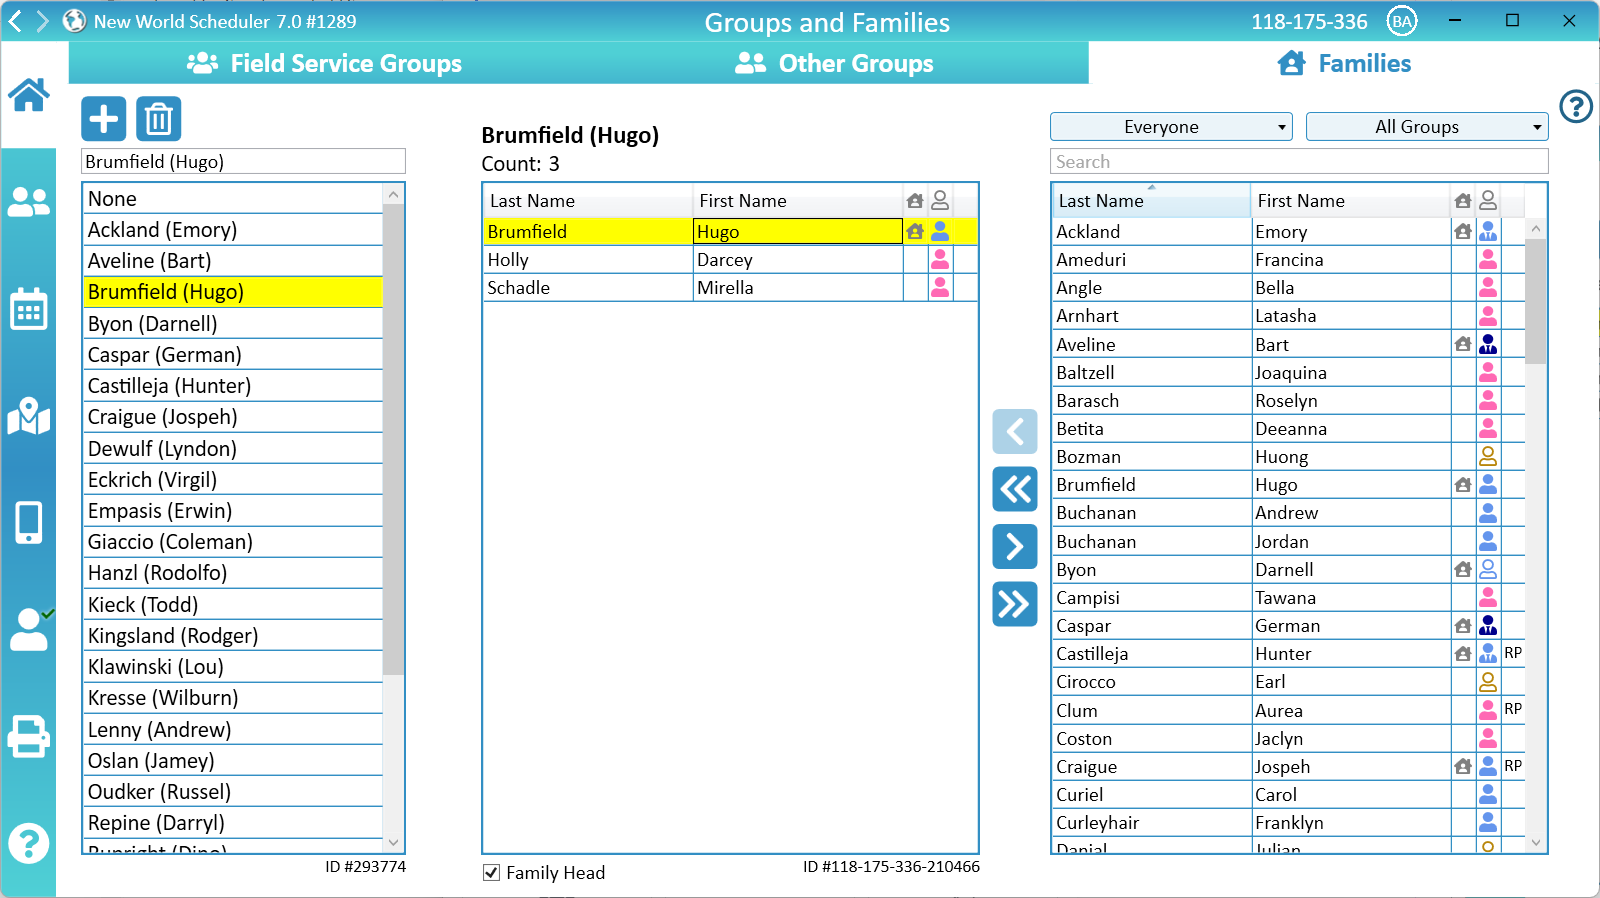
New World Scheduler allows you to create and edit Field Service Groups, Other Groups and Families.
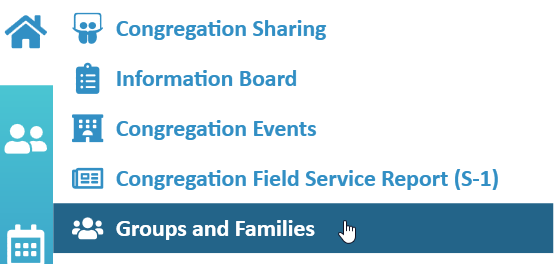
To create or edit Groups and Families, click Congregation > Groups and Families
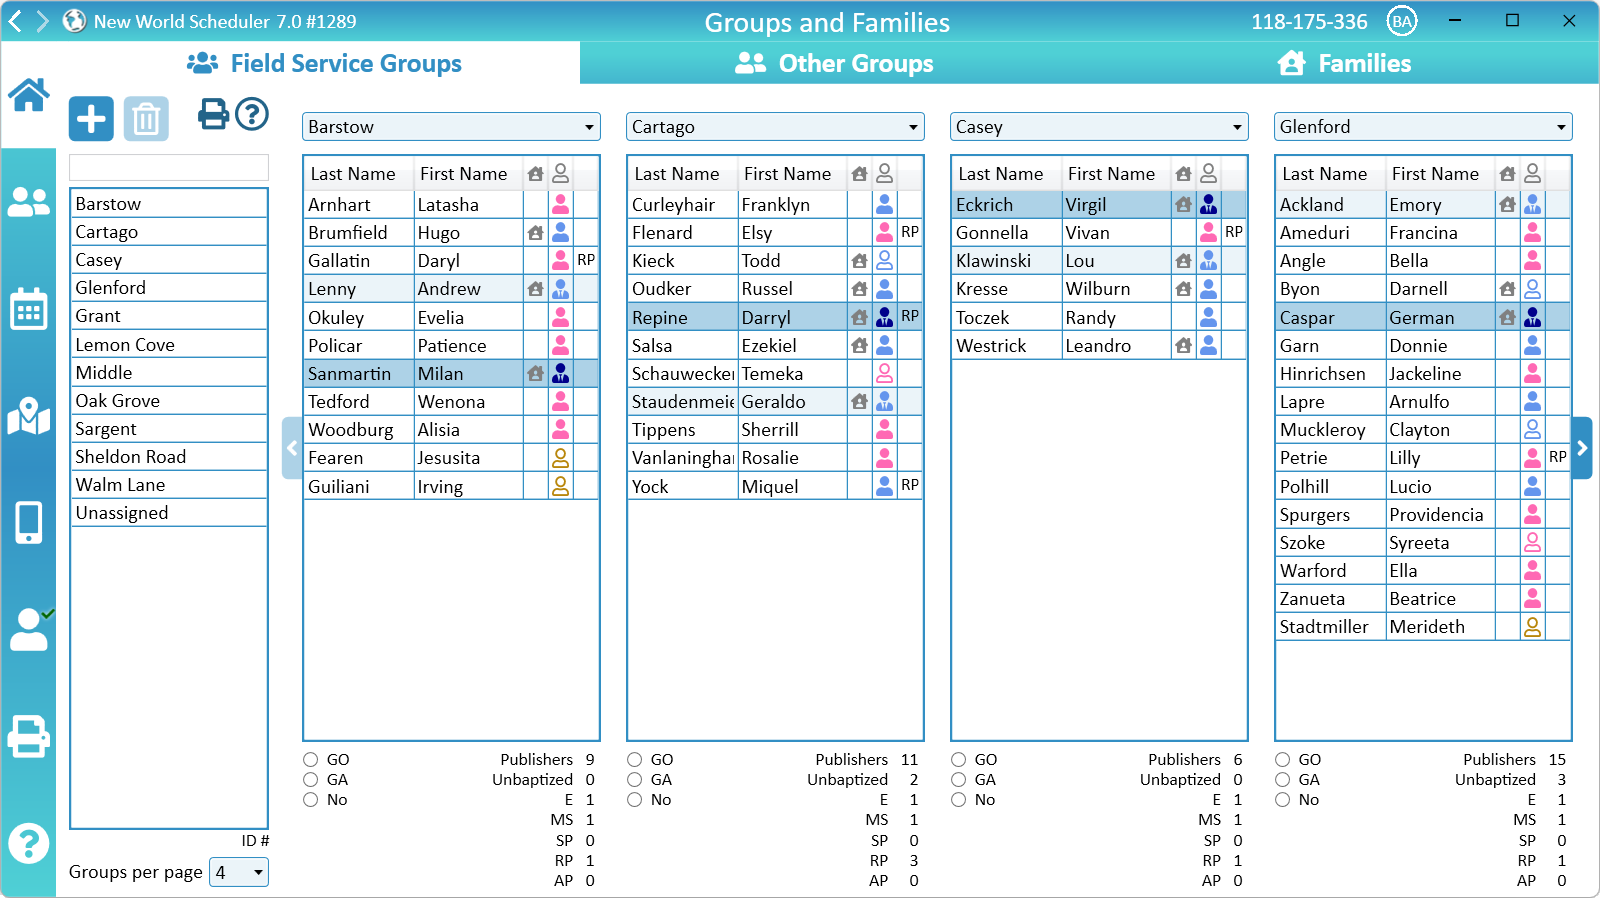
Field Service Groups
New World Scheduler lets you quickly and easily rearrange Field Service Groups, as well as see a quick summary of the size and make-up of each Field Service Group.
For flexibility, you can change the number of Groups per page, and also which groups appears in which columns.
Click the blue left/right tabs to scroll horizontally across all Field Service Groups.
- Note: You can also set a person as Group Overseer or Group Assistant.
New Field Service Group
- Click Congregation > Groups and Families
- Up the top, select Field Service Groups
- Click New
- Enter the Name of the Field Service Group in the text box (top-left)
- Note: Field Service Groups cannot be set an a Language Group. Only an Other Group can be set as a Language Group.
Arrange Field Service Groups
Simply click and drag persons from one Field Service Group to another. By default, persons are in the Unassigned group.
- Note: Persons can also be added to a Field Service Group in Person Spiritual Information
Tab left and right to see more Field Service Groups.
- Note: For flexibility, you can change the number of Groups per page, and also which groups appears in which columns
- Note: You can optionally set a person as Group Overseer or Group Assistant. This can also be done in Person Spiritual Information
- Note: To rename a Field Service Group, select the Group on the left list, then edit the Name textbox (top-left)
Display Field Service Groups
Field Service Groups can be displayed in the following ways:
- Print the Field Service Groups and display on the Congregation Information Board
- Save the Field Service Groups as a PDF or Image and add as a Congregation Information Board – Congregation Document to the NW Publisher app
- Enable the NW Publisher app – App Feature called Show Field Service Group to allow Elders or Group Overseers to see their own Field Service Group and all publishers.
Delete Field Service Group
- Note: The “Unassigned” Field Service Group cannot be deleted or edited. This is an automatic group that represent those without a Field Service Group.
- Up the top, select Field Service Groups
- Select the Field Service Group to delete
- Click Delete
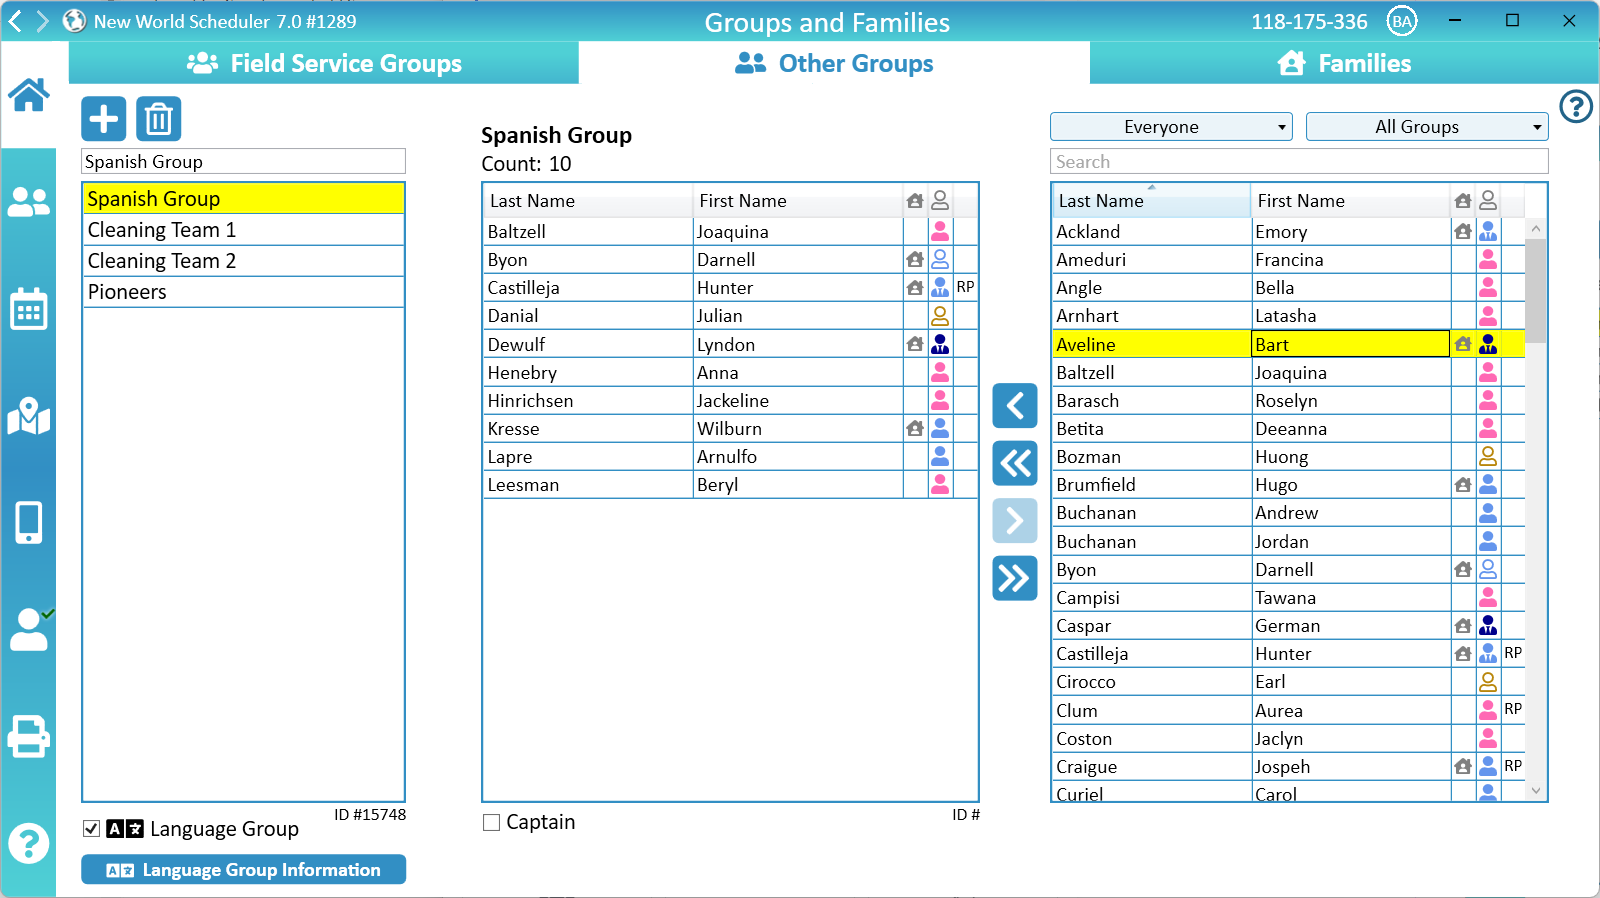
Other Groups
Other Groups allow you to create your own groups and add whichever persons you want to these groups. They are flexible and have a wide variety of uses.
- Note: Other Groups obviously do not update automatically. You must add or remove new persons as needed.
For example, you might create an Other Group for any of the following reasons:
- Language Groups
- Cleaning Groups
- Garden Care Groups
- Maintenance Groups
- Congregation Event Groups (e.g. Pioneers, Elders or Appointed Brothers)
New Other Group
- Click Congregation > Groups and Families
- Up the top, select Other Groups
- Click New
- Enter the Name of the Other Group
- Note: An Other Group can be set as a Language Group.
Add Persons to an Other Group or Language Group
- Note: Other Groups obviously do not update automatically. You must add or remove new persons as needed.
- Select an Other Group
- From the list of persons on the right, select the persons you wish to add
- Click Add
- Optionally, use Filter, Group and Search to limit the persons list, then click Add All
- Optionally, select a person and mark them as Group Captain
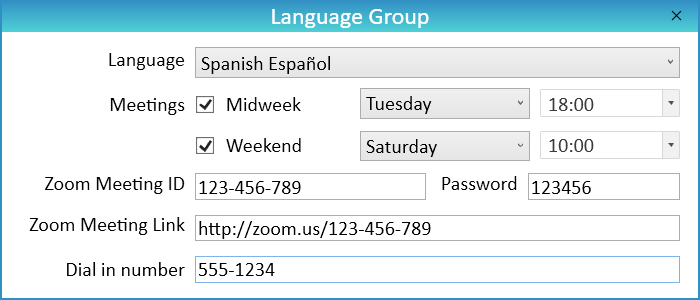
Language Groups
- Note: See Language Groups for information about how Language Groups integrate with New World Scheduler.
- Note: Field Service Groups cannot be set an a Language Group. Only an Other Group can be set as a Language Group.
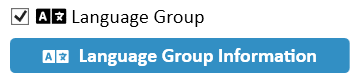
Any Other Group can be converted to a Language Group
- Select the Other Group
- Tick Language Group
- Click Language Group Information
- Set the Language
- Note: If your language is not available, select a similar language, or the language of your Host congregation. See also Import Meeting Data for a Language not available in New World Scheduler.
- Tick which Meetings the Language Group regularly holds, either Midweek, Weekend or both
- Note: If you tick Midweek, you may then schedule the Life and Ministry Meeting for this Language Group
- Note: If you tick Weekend, you may then schedule Public Talks and Weekend Assignments for this Language Group
- Set the Meeting Days and Times and Zoom Meeting information
- You can now add Congregation Events, record Meeting Attendance and schedule both the midweek and weekend meetings for the Language Group.
- Important: Only persons who have been added to the Language Group under Groups and Families > Other Groups will be shown when selecting persons for Language Group scheduling. Don’t forget to add Persons to the Language Group.
Delete Other Group
- Up the top, select Other Groups
- Select the Other Group to delete
- Click Delete
Families
Families help organise persons in New World Scheduler.
They are used for printing Contact Information, Emergency Contact information, and avoiding scheduling the same family member on the same meeting.
New Family
- Note: A new family is automatically created when you tick Family Head in Persons Information.
- Click Congregation > Groups and Families
- Up the top, select Family
- Click New
- Enter the Name of the Family
- Set the Family Type
- Note: The Family Type is used for showing the Congregation Demographics on the Congregation Overview
Add Persons to a Family
- Note: Persons can also be added to a Family in Person Information
- Select a Family
- From the persons list, select the persons you wish to add
- Click Add
- Optionally, use Filter, Group and Search to limit the persons list, then click Add All
- Optionally, select a person and mark them as Family Head
Delete Family
- Up the top, select Family
- Select the Family to delete
- Click Delete
Family Types
When creating or editing Families, you can set the Family Type.
The Family Type is used for showing the Congregation Demographics on the Congregation Overview.
Family Types are not “official” designations, they are simply used for displaying demographics which may be useful to congregation elders.
New World Scheduler provides several different Family Types, however it is up to each congregation to determine if or how to use these Family Types. We make no recommendations or suggestions.
"Single" Family Type
To designate someone as “Single”, first create a Family and add them to the family, or simply mark them as Family Head and a family will be automatically created.
Next, set the Family Type to Single.
Alternately, if you would prefer not to do this, persons with the family set to “None” or blank, are also counted as Single in Congregation Demographics.
"None" Family
New World Scheduler creates a default “None” family. This can be used if you would rather not assign single people or others to a family. You could set their family as “None”.
Alternately, you can simply leave a persons family blank. It is up to you.
- Note: Persons with the family set to “None” or blank, are counted as Singles in Congregation Demographics.
Common Questions and Problems
A new Family is automatically created when you tick Persons > Family Head. If you then un-tick Family Head, you are given the option to remove the Family. If you choose not to remove the family, you may end up with duplicate families.
In this case, simply Delete the duplicates.
When printing or saving Field Service Groups, you may tick Include Field Service Meetings. This shows the field service arrangements for each group.
This data comes from Group Field Service Meetings found in Schedule > Field Service for this week only. You must have Field Service Meetings scheduled for this week and allocated to a Group, or nothing will print.
When printing or saving Field Service Groups, you may tick Include Addresses. This includes addresses of Field Service Meetings.
This data comes from the Location of the Group Field Service Meetings found in Schedule > Field Service for this week. You must have Field Service Meetings scheduled for this week and allocated to a Group, and they must have a Location with an Address, or nothing will print.
- On the left-hand side list, select a Group
- Edit the name in the Name Textbox (top-left)
Additional Help
- Congregation Information
- Congregation Information Board
- Congregation Events
- Congregation Field Service Report S-1
- Groups and Families
- Circuits and Locations
- Neighbor Congregations and Public Speakers
- Public Speaker Sharing
- Meeting Attendance Records
- Literature
- Congregation Responsibilities
- Change or Delete Congregation
- Export for Circuit Overseer
- Backup or Restore